Pythonで以下のような画像を作成することができます. 今回はPILを使って画像を作成します. PILの詳しい使い方はPythonの画像処理ライブラリPillow(PIL)の使い方(外部サイト)で紹介されていますが, このページではフォントのダウンロード先とちょっとした描画コードを追加で紹介します.
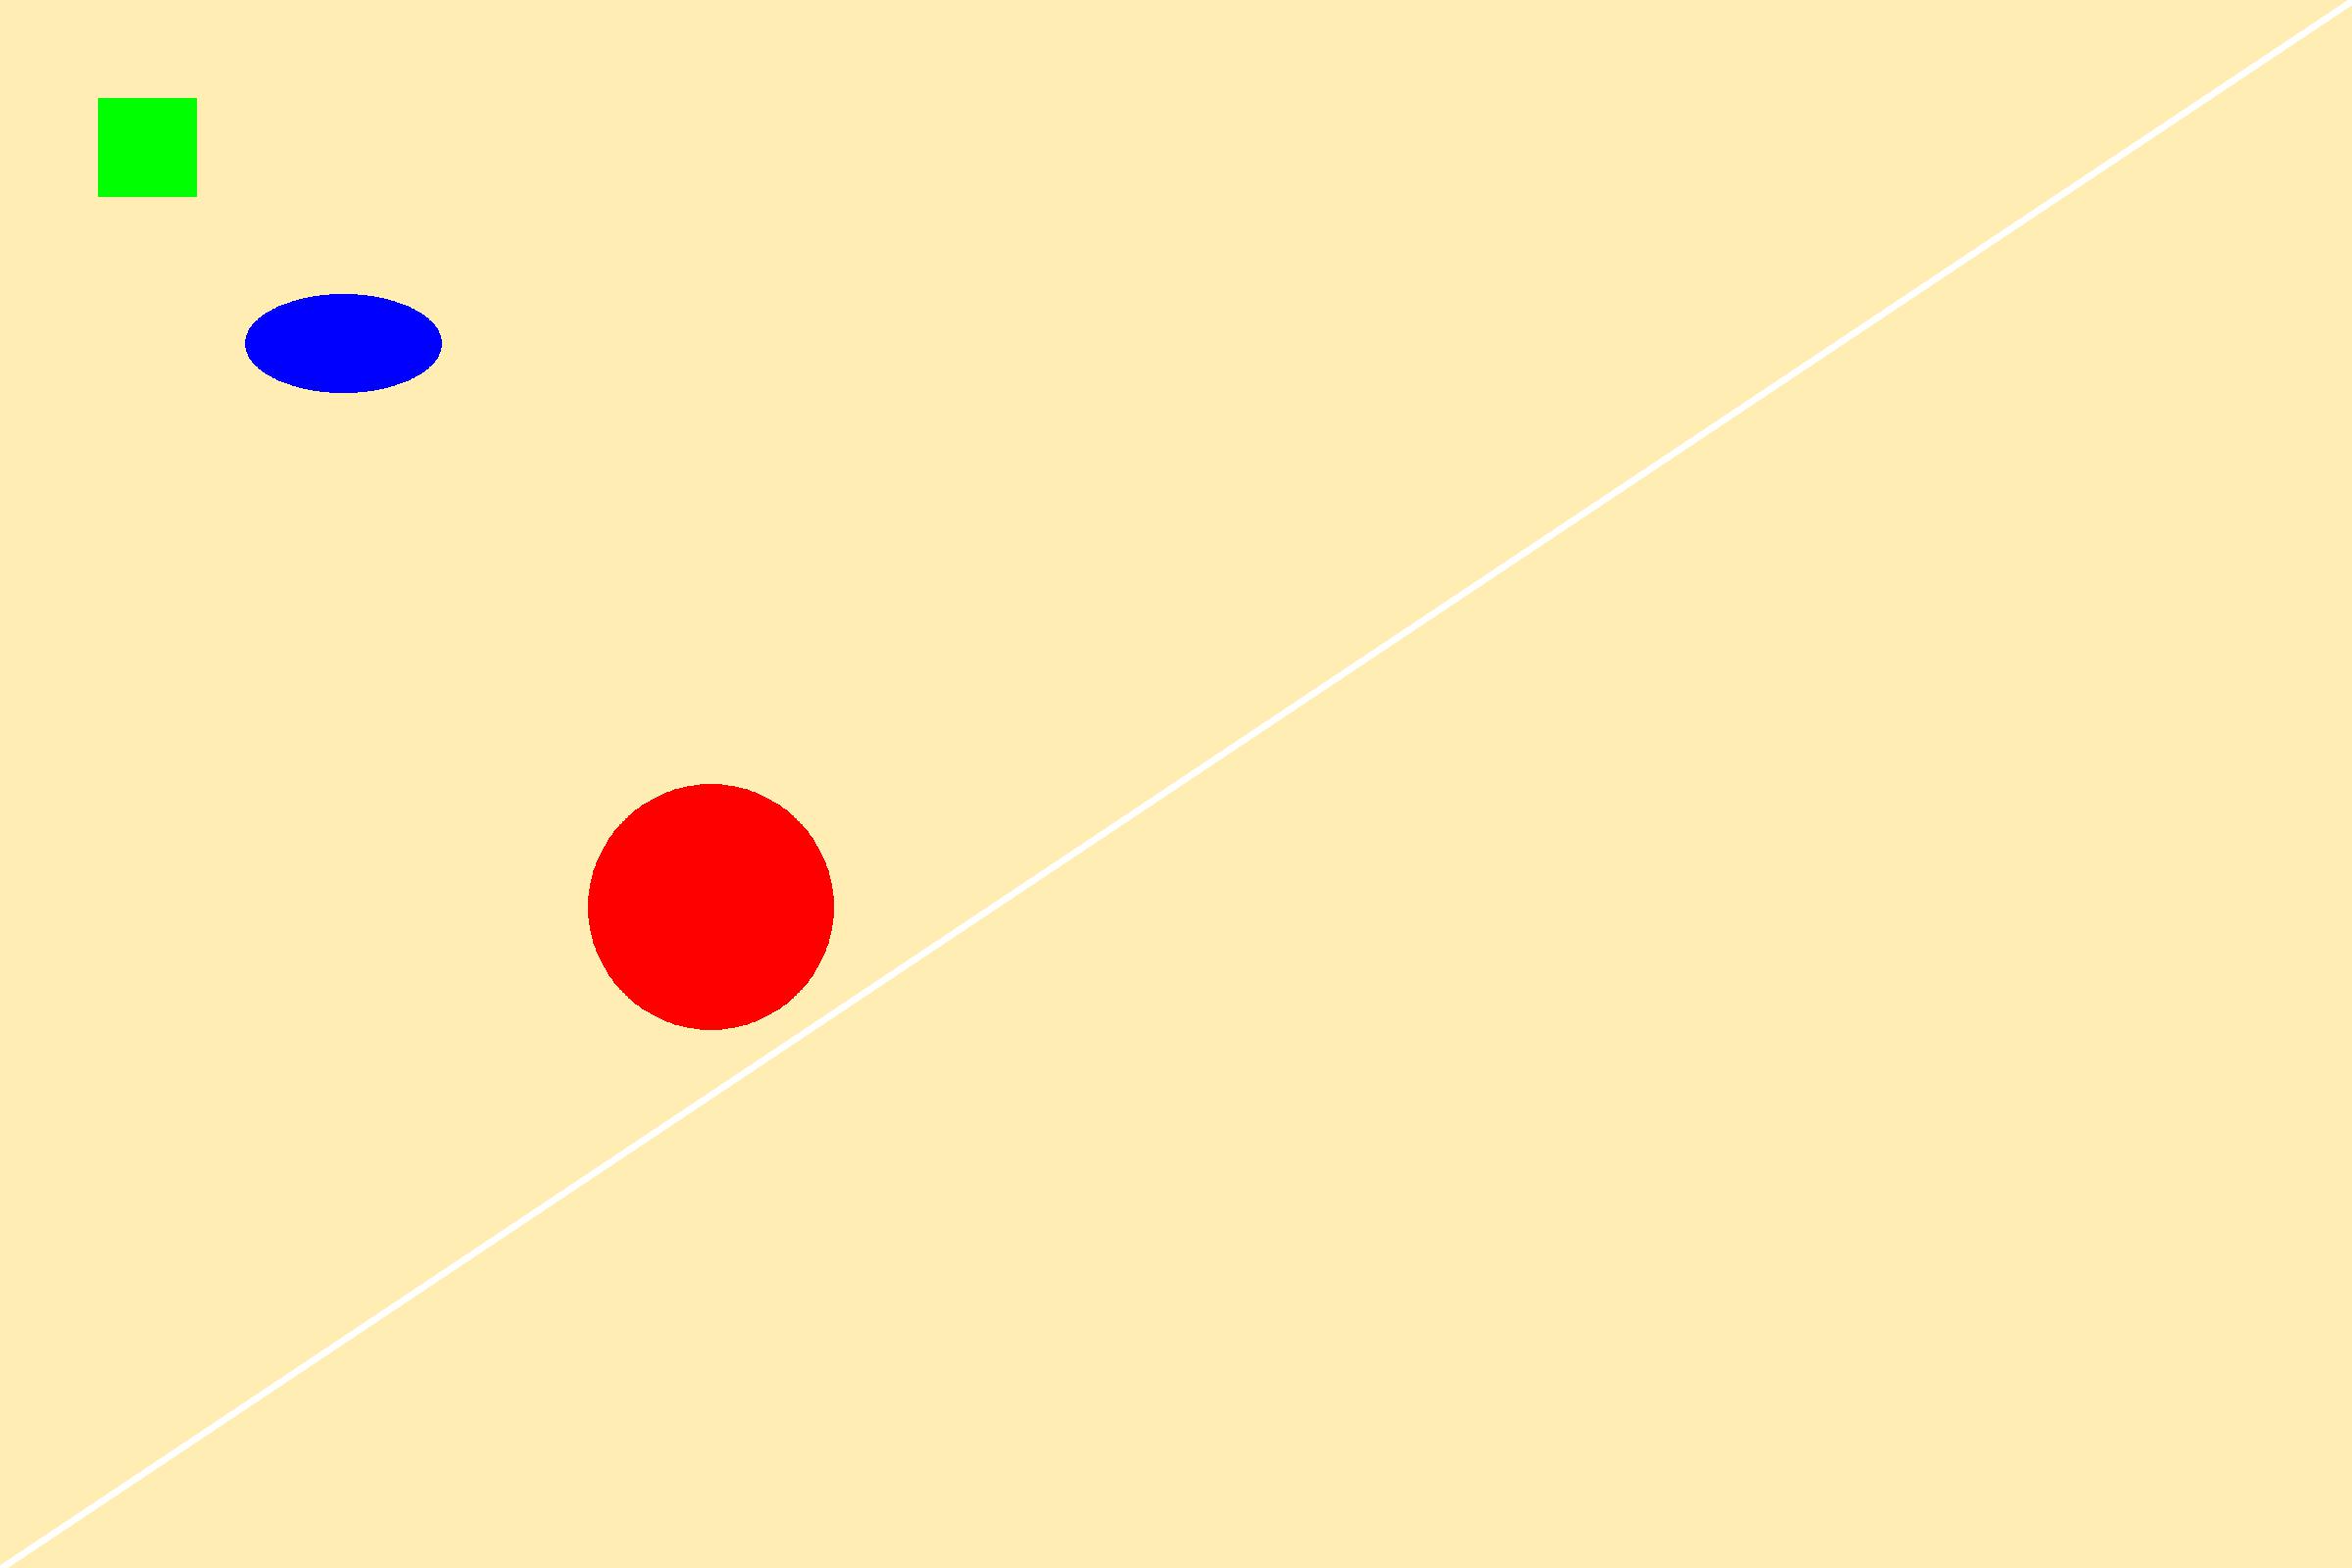
座標と色を指定して図形を描画することができます. 座標の指定は(x0, y0, x1, y1) や [(x0, y0), (x1, y1)]で行います.
from PIL import Image, ImageDraw, ImageFont

# クリーム色で塗りつぶした画像
im = Image.new("RGB", size=(2400, 1600), color=(255, 237, 179)) # (255, 237, 179)はクリーム色

draw = ImageDraw.Draw(im)
draw.line(xy=(0, im.height, im.width, 0), fill=(255, 255, 255), width=8) # 直線
draw.rectangle(xy=(100, 100, 200, 200), fill=(0, 255, 0)) # 長方形
draw.ellipse(xy=(250, 300, 450, 400), fill=(0, 0, 255)) # 楕円
draw.ellipse(xy=(600, 800, 850, 1050), fill=(255, 0, 0)) # 円( = 縦横の幅が同じ楕円)

im.show()
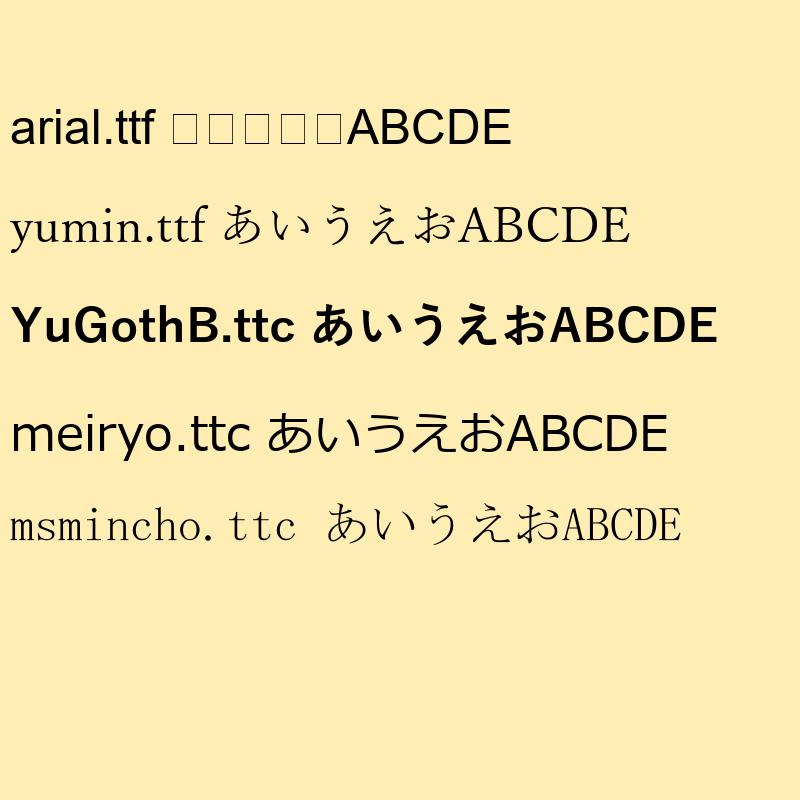
座標・色・フォントを指定して文字を描画することができます. いくつかのフォントで文字を描画しました.
from PIL import Image, ImageDraw, ImageFont

# クリーム色で塗りつぶした画像
im = Image.new("RGB", size=(800, 800), color=(255, 237, 179)) # (255, 237, 179)はクリーム色

draw = ImageDraw.Draw(im)

font = ImageFont.truetype("arial.ttf", size=48)
draw.multiline_text((10, 100), 'arial.ttf あいうえおABCDE', fill=(0, 0, 0), font=font) # arial.ttfだと日本語は文字化けしてしまう

font = ImageFont.truetype("yumin.ttf", size=48)
draw.multiline_text((10, 200), 'yumin.ttf あいうえおABCDE', fill=(0, 0, 0), font=font) # yumin.ttf(游明朝 標準)などは文字化けしない

font = ImageFont.truetype("YuGothB.ttc", size=48)
draw.multiline_text((10, 300), 'YuGothB.ttc あいうえおABCDE', fill=(0, 0, 0), font=font) # 游ゴシック

font = ImageFont.truetype("meiryo.ttc", size=48)
draw.multiline_text((10, 400), 'meiryo.ttc あいうえおABCDE', fill=(0, 0, 0), font=font) # メイリオ

font = ImageFont.truetype("msmincho.ttc", size=48)
draw.multiline_text((10, 500), 'msmincho.ttc あいうえおABCDE', fill=(0, 0, 0), font=font) # MS明朝

im.show()

from PIL import Image, ImageDraw, ImageFont

# クリーム色で塗りつぶした画像
im = Image.new("RGB", size=(600, 300), color=(255, 237, 179)) # (255, 237, 179)はクリーム色

draw = ImageDraw.Draw(im)

# フォント1 http://www8.plala.or.jp/p_dolce/
# フォント2 https://moji.or.jp/ipafont/ipafontdownload/

font1 = ImageFont.truetype('ap7/あんずもじ2020/AP.ttf', size=48)
draw.multiline_text((10, 100), 'あんずもじ2020', fill=(0, 0, 0), font=font1)

font2 = ImageFont.truetype('ipaexm00401/ipaexm00401/ipaexm.ttf', size=40)
draw.multiline_text((10, 200), 'IPAexフォント(IPAex明朝)', fill=(0, 0, 0), font=font2)

im.show()
画像の作成をするコードのサンプルです. 3×3の行列の画像です.
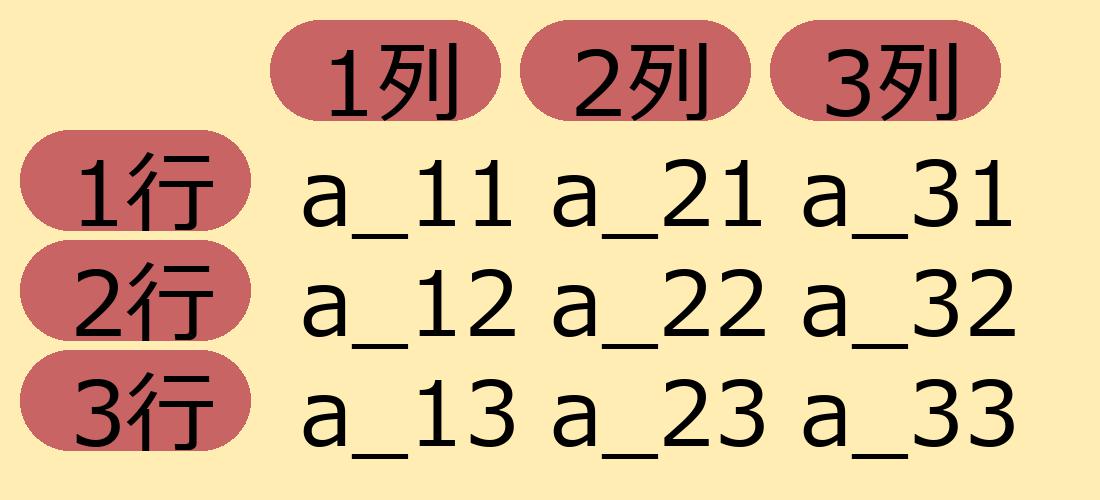
# 円と長方形を組み合わせた角丸長方形
# pos = (x1, y1, x2, y2) color = (R, G, B)
def rounded_rectangle(draw, pos, color, string=None, str_color=None, font=None):
    r = (pos[3] - pos[1])/2
    circle_l_pos = (pos[0], pos[1], pos[0]+2*r, pos[1]+2*r)
    circle_r_pos = (pos[2]-2*r, pos[3]-2*r, pos[2], pos[3])
    draw.ellipse(circle_l_pos, fill=color) # 左の円
    draw.ellipse(circle_r_pos, fill=color) # 右の円

    rectangle_pos = (pos[0]+r, pos[1], pos[2]-r, pos[3])
    draw.rectangle(rectangle_pos, fill=color) # 長方形

    if string==None:
        return False
    else:
        draw.multiline_text((pos[0]+r, pos[1]), string, fill=str_color, font=font)

from PIL import Image, ImageDraw, ImageFont

# クリーム色で塗りつぶした画像
im = Image.new("RGB", size=(1100, 500), color=(255, 237, 179)) # (255, 237, 179)はクリーム色

draw = ImageDraw.Draw(im)

font = ImageFont.truetype('ipaexm00401/ipaexm00401/ipaexm.ttf', size=90)

# 行の角丸長方形の描画
for i in range(1,4):
    rounded_rectangle(draw, pos=(20,20+i*110,250,120+i*110), color=(200,100,100),string=f"{i}行",str_color=(0,0,0),font=font)

# 列の角丸長方形の描画
for i in range(1,4):
    rounded_rectangle(draw, pos=(20+i*250,20,250+i*250,120), color=(200,100,100),string=f"{i}列",str_color=(0,0,0),font=font)

# 要素の描画
for i in range(1,4):
    for j in range(1,4):
        draw.multiline_text((i*250+50, j*110+20), f'a_{i}{j}', fill=(0, 0, 0), font=font)

im.show()
# im.save("sample.jpg") # im.save で保存できます